Yummy Cake Balls :)
Friday, December 27, 2013
Friday, December 20, 2013
Christmas Pot Roast Rub
Need an unique Christmas gift?
Why not make these Pot Roast seasoning jars?
First find mini baking pots.
Mix 1 package Ranch Dressing, 1 package Italian Seasoning, and 1 package Brown Gravy mix. You can always double, triple, quadruple the recipe :). Place 1/2 cup of the Rub in tightly sealed plastic bags.
Use scrapbook paper to make labels.
"Wishing you a Roasty Toasty Christmas (Pot Roast Rub: Italian, Ranch, & Brown Gravy Seasoning).
On the back of the card make sure to include instructions to add at least 1 cup water to the roasting pan. I make roast in the crockpot and therefore I just sprinkle the mix on the meat, add water to the bottom and cook it on low for about 6 hours.
And voila!! A sweet & simple Christmas gift that is a nice break from the ordinary sweet treats, and very practical this time of year. :)
Many Blessings!!
Monday, December 16, 2013
Sunday, December 8, 2013
Christmas Chalk Art
Monday, December 2, 2013
Sweet Green Bows
Cute Bows
Here are some super easy flower hair clips. I found this idea on pinterest, but basically cut out 5 or 6 circles, fold over and then hand stitch around the folds and pull the string tight (similar to how you make a yo-yo). Then add cute and funky buttons and attach to a hair clip. :) Now if only I had some sweet girls to wear these...

Redneck Outdoor Wreath
Joy Sign
Homemade Christmas signs! I made these by using the tracing method (print out the phrase in your font of choice & the trace them by firmly pressing with a sharp pen). By no means are the signs perfect, but they are a fun easy project to do on cold days like today!
Added some Burlap just for the season!
Christmas Signs
It's beginning to look a lot like Christmas!! Especially with the help of these fun Christmas signs that are simple to make (really they are!!). Print, trace & paint all on scrap pieces of wood.
Monday, November 18, 2013
Etsy Christmas Towels
Here are some of the fun decorative Christmas Tree towels I have for sale in my etsy shop. Feel free to copy this idea and make your own towels. :) Please also feel free to visit my shop if you decide you want a finished product that is ready to ship. Blessings to your and yours this Christmas Season.


http://www.etsy.com/shop/AboundinginBlessings
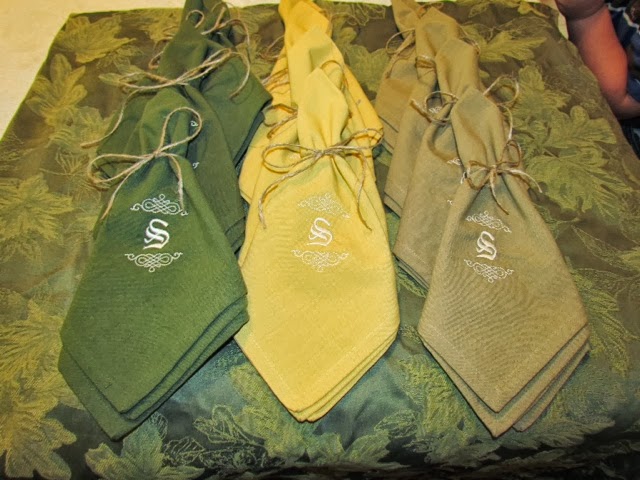
Napkins
I made these napkins for my sister-in-law. She had the brilliant idea to mix the sophistication of the napkins with the simplicity of the twine. The end result? Genius- a beautiful and personalized gift.
Blessings!!!
Monday, November 11, 2013
Sweet and Simple Have A Ball Birthday
My little man LOVES anything ball shaped. So it was a no brainer to do a simple & sweet Have a Ball Birthday. 

First, to make things fun I purchased a clearanced swimming pool & filled it with a 100 pack of balls.
Since it was fall at the time, I just added the goody bags to the fall decor.
In the goody bags: bouncy balls, polka dotted pencils, suckers, & anything else roundish.
Monday, November 4, 2013
Chicka Chicka Boom Boom Art
Here's a fun idea for all you Mommas out there...
Make Wall Art inspired by your child's favorite book. Caleb has always loved Chicka Chicka Boom Boom, so after reading it for the millionth time, the idea occurred to me to have him make his own picture of the Coconut Tree.
He was only 3 at the time so I drew the tree, but he placed every letter on the coconut tree (a great educational activity). To finish it off, we placed it in a cheap Ikea frame (my favorite thing to do when visiting Ikea is stock up on their frames because they're less than $2 apiece, they fit standard paper size, and come in all different colors).
I showed Caleb this post and he said to also make sure to tell people to go read Chicka Chicka Boom Boom and to "Eat More Chicken". :)
Blessings!!
Saturday, November 2, 2013
Rock Garden
I was given the sweetest gift a couple of Christmases ago, it was a beautifully Decorated Rock from a very dear coworker. I have always treasured the gift and decided to copy the same idea and create a rock garden for our front flower bed. I would doodle on the rocks while watching my little ones, so no "extra" time was invested.
Words of Encouragement was my inspiration and on each rock I included Scripture after being inspired by Psalms 148:5~
"Let all things praise
the name of the Lord,
because they were created
Words of Encouragement was my inspiration and on each rock I included Scripture after being inspired by Psalms 148:5~
"Let all things praise
the name of the Lord,
because they were created
at His command."
Here is a sample of a few of them:
My Rocks aren't really works of art, but they do proclaim truth. Already they have become conversation starters with my oldest and visitors.
Hope you are can take this idea and run with it. :)
Tips for Success:
-Use SMOOTH rocks
-Use permanent markers
-Spray rocks with water proof coating
-Place in shaded areas for colorfastness
Blessings~
Wednesday, October 23, 2013
Bicycle Wheel Wall Piece
Using a bicycle wheel as wall art seemed like a good and unique idea. My mind was set, I went, found one, and put it in my classroom so I could use it to display my notes and pictures. (I hung it up using command strips so they'd be strong enough to hold the weight and not damage the walls). Initially the students were confused by my choice in decoration, but it didn't take long for them to admit that it was a "cool" concept.
So it's been over a year and I found that same old wheel and Caleb said he could use it in his room. Obviously, this made me feel good. My idea was 'cool' enough for my little man, which is the greatest compliment ever. :)
We are slowly adding pictures and knick knacks.
Subscribe to:
Posts (Atom)


